 Sold out26% off
-
Sold out17% off
-
Sold out24% off


Swedish torches, also known as Swedish fire logs, fire torches, or candle logs, are an ingenious way to build a long-lasting campfire using readily available materials from nature. This ancient Scandinavian technique has become popular worldwide thanks to its simplicity and effectiveness at providing hours of glowing coals perfect for cooking, warmth, and ambiance.
What Are Swedish Torches?
Swedish torches are fire logs constructed from large sections of birch, pine, or other resinous softwood. The logs are partially split down the center and holes are drilled within the split to allow airflow when lit. Swedish torches burn clean and slow thanks to the natural oils and sap within the wood. This allows them to provide a long-lasting source of heat and coals, burning for up to 3 hours per log.
Unlike regular firewood which burns quickly and requires constant stoking, Swedish torches transform into glowing coals which can be conserved and reused. Their efficient burn makes them ideal for cooking, heating, and enjoying an outdoor campfire without continuously adding new logs. They're a staple of survival skills and bushcraft thanks to their reliability and sustainability using materials sourced straight from nature.
The Science Behind Swedish Torches
Swedish torches are the perfect manifestation of physics and chemistry. Their specialized preparation leverages natural properties of wood to create a slow, hot burn. Here's how they work:
-
Resins - Softwoods like pine and birch contain flammable resins within their structure. These sticky saps ignite easily and burn slowly.
-
Density - The dense, thick wood of old-growth logs provides a long-lasting fuel source.
-
Frayed edges - Splitting and drilling the log creates more edges for the flame to catch. More surface area = faster lighting.
-
Oxygen flow - Drilling holes allows airflow during combustion, improving efficiency.
-
Low moisture - Well-dried aged wood burns better than fresh cut logs with higher moisture.
-
Insulation - The wood's low conductivity retains heat vs. dissipating it quickly. This allows coals to remain hot for hours while the wood fully transforms to charcoal.
Understanding these principles allows you to select the best wood and prep it optimally for sustained burning.
How Does a Swedish Torch Work?
Swedish torches have a preparation process which leverages natural wood properties to create an efficient torch:
-
Source logs about 6-10 inches diameter from resinous woods like pine, spruce or birch. Older deadfall works better than fresh cut logs which have higher moisture.
-
Cut logs to length based on desired burn time. Longer logs = longer burn. 18-24 inches is standard.
-
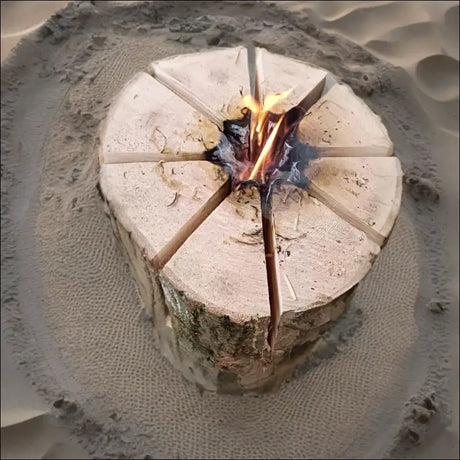
Split the log halfway down the center leaving it attached at one end.
-
Drill holes diagonally along the length of the split to allow airflow during combustion.
-
(Optional) Insert kindling, pinecones or wax into split before lighting. This helps with initial ignition.
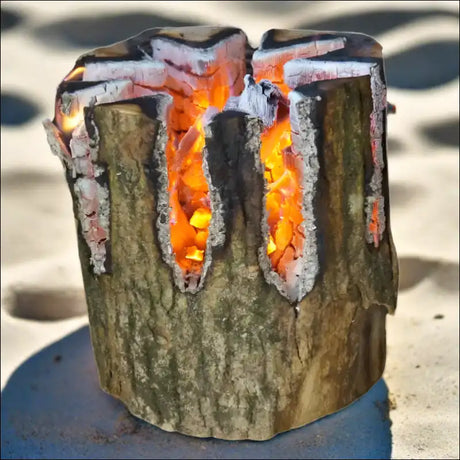
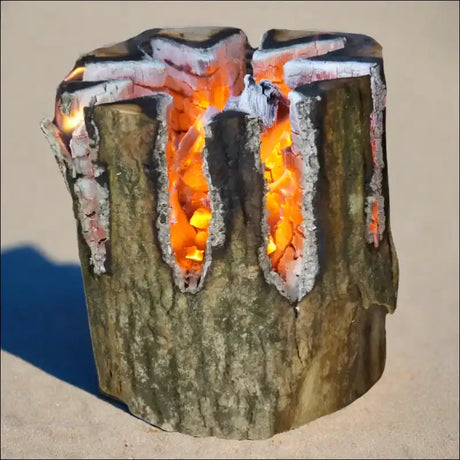
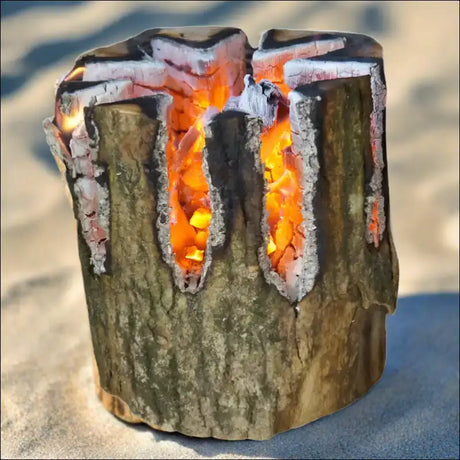
Once prepped, the torches light easily with firestarters or matches applied into the splits and holes. The resin-rich wood ignites quickly while the splits and holes provide ample oxygen to establish the flame. The dense log smolders, transforming into hot coals lasting 3+ hours. The coals conveniently concentrate in the torch's split, ready for cooking. Add a new torch or more kindling to reinvigorate the fire as needed.
What is a Swedish Torch Fire?
A Swedish torch fire refers to a campfire setup using these specially prepped logs as its main fuel and heat source. Arranged in a teepee or crisscross formation, multiple torches can sustain a fire for an entire evening, providing prolonged heat and coals for cooking.
As the torches burn down, they leave behind concentrated beds of glowing embers pooled within their splits. You can conserve these coals and use them to ignite new torches added to the fire.
Swedish torch fires are excellent for:
- Maintaining steady high heat for hours when cooking large meals
- Enjoying a maintenance-free campfire atmosphere all evening long
- Controlling your fire's size and burn time by adding more logs
- Making the most out of gathered wood by reusing coals
Their consistent burn and readily available coals make Swedish torch campfires perfect for cooking. Place a grill over the torches or nestle pots directly in the split logs to take advantage of the concentrated embers. No need for constant stoking like a traditional campfire. Let the torches work their magic!
How Long Does a Swedish Torch Burn?
The burn time of a Swedish torch log depends on a few factors:
-
Wood type - Pine generally burns longest, followed by other resinous softwoods like spruce and fir. Hardwoods like oak burn faster.
-
Log size - Bigger diameter and longer logs burn slower. Optimal is 6-10 inches thick, 18-24 inches long.
-
Preparation - Proper splitting, drilling holes for airflow, and drying extend burn time.
-
Conditions - Wind, rain, and cold will shorten burn time. Protect torches from elements.
With optimal materials and preparation, expect 2-3 hours of direct flame time per torch. After active burning ceases, the remaining coals stay hot for 1-2 more hours and can be reused to start new logs. This gives you about 4 total hours of usable heat and coals per torch.
In ideal conditions, exceptional pine torches can burn over 5 hours from start to finish. But the 2-3 hour active flame time is a realistic expectation for reliable cooking.
How to Make a Swedish Torch
Crafting an effective Swedish torch is easy with some basic tools and DIY skills. Here's a step-by-step guide:
Supplies Needed
- Dead standing pine, spruce or birch logs about 6-10 inches diameter and 18-24 inches long
- Hand saw or chainsaw to cut logs
- Splitting maul, ax, or wedge for splitting
- Drill with 1-inch bit, power drill works best
- Kindling material (pinecones, wax shavings, chips) optional
- Gloves & safety equipment
Instructions
-
Source your logs. Look for dead, dried pine, spruce or birch logs naturally seasoned in the wilderness. The wood should sound hollow when smacked, not dull.
-
Cut logs to length using a saw. 18-24 inches is optimal. For a single torch, cut one log. For sustained fire, cut multiple logs of varying lengths for staggered burn times.
-
Split each log down the center leaving 2-3 inches connected on one end. Aim for a 50/50 split. Use a maul, ax or wedge and go slowly to avoid breaking the log.
-
Drill holes along the length of the split, diagonally traversing from one side to the other. Space holes about 1-2 inches apart. Depth doesn't matter.
-
Add kindling (optional). Stuff wax wood shavings, pinecones or tinder into the split to help ignite the torch faster.
-
Ignite tinder or kindling protruding from split using matches or a firestarter. Can also pour wax or kerosene in split to accelerate lighting if needed.
The torch will fully ignite within about 10-15 minutes. Add more torches to build up the fire as the first torch burns down. Maintain for 3-4 hours per log.
How to Light a Swedish Torch
Thanks to their resin-rich wood and ample built-in kindling, Swedish torches light easily even under damp conditions. Here are some techniques:
Kindling firestarter
- Prepare torch with split and holes drilled.
- Stuff wax shavings, pinecones, wood chips or other kindling into the split.
- Insert firestarter cube, chemical tablet or combustible like kerosene/alcohol soaked cotton within kindling inside split.
- Light firestarter. It will ignite kindling, which spreads to log.
Wax soaked strips
- Prepare torch.
- Cut wax or cardboard into 1-inch strips. Soak in kerosene or alcohol.
- Insert strips into drilled holes and split.
- Light strips which ignite the log from interior.
Flame applicator
- Prepare torch.
- Use match, lighter, or flaming twig/grass stem.
-
Apply flame directly to holes and split interior.
-
Blow gently on flame to feed oxygen until log ignites.
Within 10-15 minutes, the torch will be fully lit and burning strong. For extra assurance, apply flame to any unburned sections until the entire log has ignited. Sit back and enjoy up to 3 hours of glowing torchlight!
Can You Make a Swedish Torch Without a Chainsaw?
While chainsaws make chopping logs easier, you can absolutely make Swedish torches without power tools using just hand saws and axes. Here's how:
Cutting logs
- Use a bow saw or buck saw to cut logs to length. Takes longer but works just fine.
- For larger logs, cut halfway through from one side, then complete cut from the opposite side to avoid pinching blade.
Splitting wood
- Use a hand axe, hatchet or wedge to split logs instead of a mechanical splitter.
- Place wedge at center and tap into log with an axe or mallet.
- Go slowly to control split direction. Repeated taps will split even large logs.
Drilling holes
- A basic hand brace with 1-inch bit effectively bores airflow holes.
- Rotate brace smoothly but firmly. Apply pressure on the push stroke.
- Let bit do the work; don't force. Sharpen bit for easier drilling.
With practice, you can produce perfect Swedish torches using only hand tools and elbow grease. The extra effort pays off when enjoying a cozy torch fire made completely from natural materials!
Where To Buy Swedish Torch Logs
Swedish torch logs have become a popular campfire and outdoor-living product. While you can make DIY torches from natural materials, buying premade logs provides convenience. Local Suppliers and businesses like Hillside Woodfuels supply organic, natural and high quality swedish torches.
With Swedish torches' popularity, you have lots of options between DIY natural foraging, big box bulk buying, or purchasing specialty prepped fireplace logs based on convenience and budget. Start stockpiling your supply now for cozy evenings around the campfire!
Swedish Torch vs Regular Firewood: What's the Difference?
Swedish torches may look like ordinary firewood but their preparation and burning characteristics are vastly different. Here's how they compare:
Preparation
-
Swedish torches are partially split, drilled with holes for airflow, and made from resinous softwoods.
-
Regular firewood is chopped logs from mixed hardwood/softwood, unaltered.
Ignition
-
Torches light within minutes even when wet due to built-in kindling and airflow holes.
-
Regular logs can take 30+ minutes to fully ignite and struggle in damp conditions due to lack of tinder.
Burn time
-
Torches provide 2-4 hours of sustained coals and flames per log.
-
Regular wood burns quickly, needing new logs added every 1-2 hours.
Heat production
-
Torches radiate intense heat as they transform to charcoal, creating 2+ hour coal beds.
-
Regular fires spike heat while flaming then subside quickly between adding new logs.
Coal bed
-
Torches concentrate perfectly sized coals within split cavity, ready for cooking.
-
Regular fires produce uneven coal beds that burn quickly and are hard to cook over.
Thanks to their specialized preparation, Swedish torches burn longer, easier, cleaner and leave plentiful cooking coals vs traditional campfire wood. It's like comparing a propane stove to a bonfire!
Are Swedish Torch Logs Safe?
When used properly, Swedish torch logs are totally safe thanks to their clean-burning materials and design:
-
All natural wood - Made from 100% untreated natural pine/birch. No chemicals, oils or binders.
-
Low sparks - Their contained split design emits few stray sparks or embers, unlike open campfires.
-
Less smoke - Resins help torches burn cleaner with less smoke than regular open fires.
-
Controllable burns - Adding logs is easier vs rekindling regular fires, preventing dangerous flare-ups.
-
Fire management - Concentrated flames and coal beds reduce spread risk compared to scattered campfires.
However, standard fire safety rules still apply:
-
Use a fire ring or pit and avoid dry conditions prone to spreading.
-
Don't leave torches unattended. Monitor continuously.
-
Keep water and a shovel nearby to extinguish fully after use.
-
Ensure any embers are completely extinguished before leaving the site.
With basic precautions, Swedish torches safely contain the fire while maximizing burn efficiency. Their natural materials and purpose-built design make good fire management easy.
How Long Do Swedish Torch Logs Last When Stored?
Like regular firewood, Swedish torch's shelf life depends on storage methods:
1-3 months max:
-
Uncovered outdoors exposed to rain and moisture
-
Stored in damp basements or sheds
-
Kept close to ground in contact with dirt
-
Containing unsplit green wood with high moisture
6-12 months typical:
-
Stacked off the ground under tarps or covering
-
Kept under roof in well-ventilated shelter
-
Seasoned split wood with lower moisture
1-2 years or more:
-
Fully protected from weather and humidity
-
Store in waterproof wrapping
-
Keep indoors if possible
-
Use aged, dried seasoned wood sources
The more you minimize moisture and rot risk, the longer Swedish logs remain usable. Avoid green wood and wet storage conditions. And burn within 1-2 years for best performance. Properly stored torches conveniently withstand time while awaiting your next adventure.
How Hot Does a Swedish Torch Burn?
Swedish torches create an impressive concentrated heat thanks to their design and dense wood:
-
Flaming stage - Burns around 593°C - 704°C (1100°-1300°F) first 1-2 hours when in active flame.
-
Coal stage - Glowing embers reach 538°C - 677°C (1000°-1250°F) for 1-2 hours after flaming ceases.
This allows Swedish torches to rival the heat of a standard campfire while focusing it into a sustained burn. Temperatures remain hot enough to:
-
Boil water in under 5 minutes.
-
Cook meats, vegetables, and even bake.
-
Radiate warmth across a 10+ foot radius.
The split log shape concentrates heat in a bi-directional pattern, making them perfect for heating shelters. Thetorches and their coals burn as hot as an open hardwood bonfire for hours longer!
What Can You Cook Over a Swedish Torch?
The prolonged high heat of Swedish torches makes them exceptional cooking tools:
Meats
-
Steaks, chops, kebabs, chicken, fish
-
Bratwurst, hot dogs, sausages
-
Whole roasts, leg of lamb, turkey legs
Vegetables
-
Potatoes, yams, onions, carrots
-
Peppers, corn on the cob
-
Eggplant, squash, zucchini
Eggs
-
Fried, scrambled, omelets
-
Poached
-
Baked in casseroles
Breads
-
Biscuits
-
Rolls, buns
-
Pizza
-
Fruit and nut quickbreads
Desserts
-
Baked apples
-
Pies, cobblers
-
Fruit crisps and crumbles
-
S'mores!
With a little creativity, you can cook entire meals over Swedish torches - from appetizers to dessert! Their coal longevity provides flexibility while their concentrated heat prevents burning or scorching food quickly like open fires.
Swedish Torch Cooking Tips & Recipes
Take your camp cooking to the next level with these pro tips and recipe ideas perfectly suited to Swedish torches:
Meat
- Get better browning by searing steaks/chops first. Then move to indirect heat.
- Elevate poultry and roasts on stones or grill above coals to prevent scorching skin.
- Baste meats while cooking with marinades and sauces for extra moisture and flavor.
Veggies
- Parboil potatoes first for tender cooked interiors. Finish cooking over coals.
- Brush veggie chunks with oil and seasoning. Skewer or wrap in foil with seasoning to roast.
Breads
- Keep dough lumpier rather than kneaded
- Use a cast iron pan or pie iron placed right on coals to bake breads and pizzas
- Bread rolls can be wrapped in foil or cooked in a covered cast iron Dutch oven
Desserts
- Fruit crisps and cobblers taste amazing when cooked over coals in a cast iron skillet or Dutch oven
- For quick individual desserts, wrap sliced fruit and cake/brownie batter in foil pouches
Campfire Stew Recipe
- Ingredients: beef, potatoes, carrots, onion, broth, seasoning
- Prep veggies and meat. Seal meat in foil pouch to cook 10 minutes.
- Add broth and veggies to pot. Simmer until tender.
- Add meat and let stew 5 minutes.
Foil Pack Chicken Fajitas
- Mix chicken, peppers, onions, seasoning. Wrap in foil packs.
- Grill packs 8-10 minutes each side.
- Serve in warmed tortillas with favorite toppings.
Smoky Maple Salmon
- Brush salmon filets with maple syrup and smoked paprika.
- Grill skin-side down 5-6 minutes until opaque and flaky.
Coal Baked Apples
- Core apples and fill centers with brown sugar, raisins, pecans.
- Wrap in foil and place in coals 10-15 minutes until tender.
Be creative and leverage the steady high heat of Swedish torches to cook virtually any camp cuisine!
How to Build a Swedish Torch Fire Pit
A Swedish torch fire pit is the perfect centerpiece to any outdoor space. Create one in your backyard with these easy steps:
Pick a spot
Look for a level area safely away from trees/structures with good drainage. An existing natural depression or shallow dug pit will work well.
Build the wall
Use rocks, bricks or landscape blocks cemented in place to make a containment circle around the pit area. Leave an opening for accessing inside.
Add gravel base
Fill pit interior with pea gravel layer to allow drainage and prevent sinking.
Install grill
Place a heavy duty adjustable cooking grill over the gravel base spanning the pit's width.
Ignite torches
Arrange 4-6 torches in a teepee or log cabin pattern over gravel bed. Light according to torch instructions.
Manage fuel
Replenish with new torches as needed to maintain your desired flames and cooking heat level.
Customize options:
-
Line interior with fireproof bricks for heat radiation
-
Create seating around the pit perimeter using benches, stools or patio blocks
-
Install a pulley system over the pit for hanging cookware
With minimal time and effort, you'll enjoy the beauty and functionality of cooking over a glowing Swedish torch fire pit for years to come!
6 Tips for the Perfect Swedish Torch Fire Pit
Elevate your outdoor living space with a custom Swedish torch fire pit. Follow these tips for best results:
1. Choose durable materials
Use high-heat, weather-resistant bricks, rocks, or pavers to construct the containment circle. This prevents cracks from heat exposure.
2. Add insulating base
Line the bottom with gravel, sand or firebrick to prevent scorching and dissipate heat. This also helps drainage.
3. Consider shape
Circular, square or rectangular pits work well for flexibility in arranging torches. Oval and unique shapes add flair too.
4. Calculate size appropriately
Scale the size based on number of torches needed for desired burn times and heating coverage. Allow room for rearranging logs.
5. Include accessories
Incorporate built-in seating, adjustable grilling surfaces, and storage for fire tending tools to extend usefulness.
6. Check local regulations
Research relevant codes for outdoor fire pits in your region prior to installing a permanent torch fire feature.
With smart planning using quality materials, your DIY Swedish torch fire pit will provide the ultimate backyard upgrade for cooking, warmth and ambiance.
Conclusion
Swedish torches represent the pinnacle of efficient, sustainable outdoor heating and cooking. Their unique preparation transforms natural wood into a slow-burning, coal-producing fire log that's easy to ignite and manage. With a little knowledge and practice, anyone can leverage Swedish fire methods to amplify their next camping trip or backyard gathering.
This guide covers the origins, science and applications of Swedish torch techniques. Now you can confidently source materials, hand-craft torches, and operate Swedish torch fires like an expert. Embrace the warmth and comfort of this timeless natural fire technology passed down for generations. Get started on crafting your own Swedish torches today or buy pre-made Swedish Candles from Hillside Woodfuels!
Swedish Torches Q&A
What is Swedish torch good for?
A Swedish torch, also known as a Swedish log, candle, or firebrand, is a special way of burning wood to produce a long-lasting, intense fire with minimal smoke. The wood is cut and split in a way that allows more surface area to be exposed to oxygen, resulting in very thorough combustion. Swedish torches are good for providing a concentrated heat source and light, especially in cold weather camping or emergency situations.
How long will a Swedish torch burn?
The burn time of a Swedish torch can vary quite a bit depending on the size and type of wood used, but generally they will burn intensely for 2-4 hours and can smolder for up to 8 hours or longer. Hardwoods like oak or maple will burn longer than softwoods like pine. Bigger logs will also burn longer than smaller ones. Properly made, a Swedish torch can provide heat and light for most of a night.
What is the Swedish torch method?
The Swedish torch method involves cutting and splitting logs in a strategic way to maximize burn efficiency. First, a section of log about 18-24 inches long is cut. Next, numerous splits are made into the top end of the log section, leaving the bottom end intact. These splits allow more air circulation. The splits are fanned out slightly and small kindling is placed in the center. The torch is lit from the top down. The initial kindling provides the heat needed for the thick log to catch fire and burn steadily.
What is the best wood for a Swedish torch?
The best woods for making an effective Swedish torch are dense hardwoods like oak, maple, ash, or beech. These woods are dense and dry slower than softer woods like pine, allowing them to burn hotter and longer. The wood should also be well-seasoned and dry. Softwoods can be used if properly dried. Birch bark is also commonly used as starter fuel for Swedish torches.
Why is it called a Swedish torch?
The Swedish torch gets its name from its origins in Scandinavia, where there is a history of burning wood in this split log manner for heat and light in fireplaces and open hearths. The specific preparation of the wood allows cool northern climate woods to burn more efficiently. The technique likely dates back centuries in Nordic countries like Sweden.
What are the key elements of a Swedish torch?
The key elements of a proper Swedish torch are a dense hardwood log section about 18-24 inches long, multiple splits made into one end to allow air flow, fanning the splits slightly, and using kindling in the splits to start the fire from the top down. This method maximizes burn efficiency.
What tools do you need to make a Swedish torch?
The basic tools needed are a saw to cut the log section, a sharp axe to split the wood, and a knife or small hatchet to fan out the splits. A rake can also help arrange the kindling. You'll need fire starting supplies like matches, lighter, or flint and steel.
How big should a Swedish torch be?
Swedish torch sizes can vary, but a typical size is 18-24 inches long and 6-10 inches diameter. Bigger torches will burn longer but smaller ones are more portable. The log section should be short enough to stand upright and thick enough not to tip over.
How long does it take to make a Swedish torch?
With some practice, a Swedish torch can be assembled in about 10-15 minutes. It takes a few minutes to cut the log section, a few more to split one end, and some time to arrange the kindling. An experienced camper can make one quickly.
Can you make a Swedish torch without power tools?
Yes, Swedish torches have been made for centuries without power tools. A saw, axe, and knife are all that's needed. The splitting does require some strength and effort compared to using a power splitter.
How do you start a Swedish torch burning?
Start by lighting kindling placed into the splits at the top of the log. Once the kindling takes off, the flame will spread down the splits in the wood and ignite the whole torch. Taking care to light from the top makes it easier.
What's the difference between a Swedish torch and a regular campfire?
A Swedish torch concentrates the fire into a single log for more focused heat and light, whereas campfires use multiple logs for a bigger fire. The strategic splitting allows the torch log to burn more efficiently.
Is a Swedish torch safe for indoor use?
Swedish torches are intended for outdoor use only. The intense, open flame would be unsafe for indoor use where ventilation is limited. Smaller Swedish candles could potentially be used indoors in fireplaces if properly contained.
What are alternatives to making a full Swedish torch?
Some alternatives are using just the split log method on smaller logs to make mini Swedish torches. Or make Swedish candles by tightly wrapping birch bark around small split logs.
Why are Swedish torches good to know for emergencies?
Swedish torches allow building an efficient fire with minimal tools and preparation. In an emergency where warmth, light, and cooking are needed, a Swedish torch fire can meet many needs while using the available wood resource fully. The simple design has many survival benefits.
Here are 10 more questions with a focus on using the phrase "Swedish torches":
What are some tips for preparing Swedish torches?
Some tips for preparing good Swedish torches include using well-seasoned dense hardwood, making plenty of splits in the end of the log, slightly fanning the splits, and having proper kindling on hand to start the torch quickly. Taking time to prepare the Swedish torch well will allow it to burn longer and more efficiently.
What size logs work best for Swedish torches?
For Swedish torches, medium sized logs around 6-8 inches in diameter and 18-24 inches long are ideal. Logs should be short enough to stand upright but thick enough not to tip over. Very large logs won't have enough splits or air circulation. Small logs won't last as long. Properly sized logs make great Swedish torches.
How do you add more wood to a burning Swedish torch?
Carefully place splits of wood into the burning top of the Swedish torch, like feeding a campfire. The flame will catch the new pieces if placed into the hot coals. Avoid smothering the Swedish torch by adding too many pieces at once. Build it back up gradually.
What are the main benefits of using Swedish torches?
Swedish torches concentrate the heat and light in one place, burn very thoroughly for less smoke, and provide lasting heat and ambience for gatherings. They allow burning larger diameter wood efficiently. The customizable heat and lighting are key benefits of Swedish torches.
Can you safely roast marshmallows or cook over a Swedish torch?
Yes, Swedish torches can be used for cooking, but take precautions. Their concentrated flame puts off intense heat for roasting or grilling. Move food around to prevent burning. Avoid touching the actual flame. Position cookware safely above the torch.
Should you use green wood or seasoned wood for Swedish torches?
Always use well-seasoned and dried hardwood for constructing the best Swedish torches. Green or wet wood will smolder instead of maintaining flame. Taking time to prepare dry split wood leads to superior burning Swedish torches.
How are Swedish torches different from other fire lighting methods?
The strategic splitting and kindling placement of Swedish torches allow for efficient top-down burning. This sets them apart from normal campfires or bonfires which often waste wood. Swedish torches also focus the heat and light more than a Dakota fire hole or teepee setup.
What are some safety tips for using Swedish torches?
Safety tips include keeping Swedish torches in a fire ring or on non-flammable surfaces, avoiding touching the hot wood, keeping children and pets away, and having a fire extinguisher or water nearby. Never leave a Swedish torch burning unattended.
Can you make mini Swedish torches for small fires?
Yes, the Swedish torch method works well for smaller "mini" torches too. Use 10-12 inch sections of smaller diameter logs and add proportionally smaller kindling to the splits. Mini Swedish torches provide concentrated heat sources for tight spaces.
Why choose Swedish torches over a regular campfire?
Swedish torches burn more efficiently, concentrate heat and light, work better in wind, provide a focal point for gatherings, and fully utilize the wood resource. Their customizable heat and ambience make Swedish torches an excellent choice over normal campfires.